Showing posts with label household. Show all posts

Wednesday, January 23, 2013

Fixing a Leaky Refrigerator Water Dispenser

Picture from Over Engineered

Ken over at the Over Engineered blog posted a great article on repairing a leaky refrigerator water dispenser. He traced the problem to a leaky solenoid and talks about how he fixed it. Neat.

I'm due to repair my ice maker one of these days. I'll be sure to post up when I do.

Saturday, September 1, 2012

DIY Garage Shelves

If you have--or can find--some scrap 2x4, 2x3, plywood, you can make some convenient, sturdy, DIY garage shelves. Or you can buy the wood new. I confess I had to use quite a bit of new wood but made the most of my scraps, too.

DIY garage shelves
Ah, wonderful shelf space for my gadgets and camping gear...

DIY Garage Shelf Design

The design I've been using for several years utilizes 2x4 vertical members in front to support the shelves, 2x3 frames for the shelves, and cheap 1/4" pressboard surfaces on top of the frames. The frames are secured to wall studs in back and the 2x4 verticals in front.


DIY garage shelves
The DIY garage shelf design

I put a set of shelves in several years ago and they've held heavy Jeep parts, gardening supplies, and myriad other items without any issues. 

Disclaimer: of course you're responsible to make sure of the safety and viability of the design and your installation as with any DIY project.


The pressboard will deform over time if the weight on it is above about 50 lbs. If that matters to you, thicker pressboard or plywood will support more weight without deforming but it's more expensive. You might try 1/2" or even 3/4" thick material. 

Garage Shelf Construction

DIY garage shelves
Two 2x4 uprights supporting a single shelf secured to wall studs in back
First, determine the depth of the shelves. In my case, about 17" was acceptable, with an extra 1.5" for the width of the studs in front of the shelves.

Subtract the width of your 2x3 boards, a total of 3", from the shelf depth to get 14" in my case. That's the length of the shorter pieces.


DIY garage shelves
Measurements for the shorter shelf pieces
I made the longer pieces 4' (48") as 2x3 and pressboard comes in 8' units.

Now build two shelf frames, the lowest and the highest shelves, then measure and attach to the wall at the desired heights.

I constructed the frame with 2-1/2" or longer wood screws and secured the frame to the wall studs with 3" wood screws.

At this point you can now attach your 2x4 studs. At the start or end of your shelving, place the 2x4 flush with the end of the shelf.

DIY garage shelves
Front view. 2x4 is flush with shelf edge
If you have two shelves side-by-side, a single 2x4 upright is used to support both shelves, just put the 2x4 in place to overlap two shelves.
DIY garage shelves
Back view; note two shelves supported by single 2x4
Detail shot of the installation; single 2x4, two shelves
Cut the pressboard or plywood panel to fit the shelf, in my case 17"x48". Secure it with 1" wood screws or longer. I used self-tapping flat head 1-1/2" screws.

DIY garage shelves


After you've gotten the first two shelves and the two uprights in place, it's easier to add more shelves and uprights. After awhile you'll have a set of nice, useful, sturdy garage shelves. Enjoy!

Friday, June 12, 2009

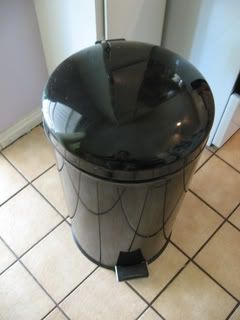
Don't trash your trash can, fix it!

We have one of those trash cans with the flip lid that you activate with a foot pedal. Ours failed and I think this is a fairly common problem with these cheap step cans.

The design is pretty poor, like so many things these days, meant to cut costs to the bare minimum (gee, thanks Carnegie), longevity be damned. (Or in some cases I should say, "obsolescence be planned")

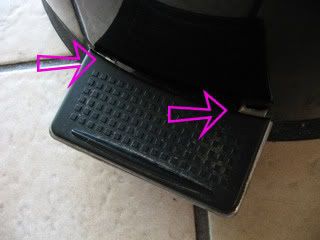
First, the lid is heavy and there isn't a lot of mechanical leverage to lift it. A rod is actuated by the foot pedal and always required a lot of force to open the lid. It always annoyed me. The foot pedal is attached to the can body with metal tabs. Over time with all the forces involved, these tabs bend loose and the foot pedal comes loose.

So do we trash the trash can? Well, obviously not, judging by the kind of blog this is. So how did I fix this one? I gained a few months by fixing the bent metal tabs on the foot pedal. After a second failure, I had to come up with something more permanent.

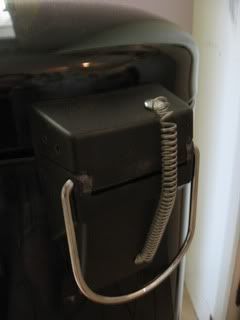
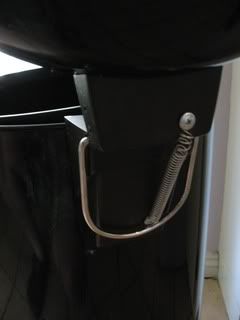
With the main issue being the forces required to open the lid, I decided to try and use a spring to aid in the lifting of the lid. I got a pack of springs from HarborFreight a few years ago and they are always coming in handy.

I did a little guesstimating and playing around with the mechanism and decided on a couple of mounting points on the of the lid hinge. I didn't get it right the first time, but eventually I got the spring to where the lid will lift -- and also stay up -- with a fairly light pedal press. Then I fixed the pedal tabs again, hopefully for the last time (if not, I'll try something sturdier).


A little more creativity could be applied to camoflague the bright chrome spring. Flexible paint? Wrap in a heat shrink tube? Any ideas?