Recently, the speed selector / gear shifter broke (see picture to the right; small black part top center) rendering the unit useless.
The shifter mechanism had been growing stiffer and more difficult to use in the year or two prior to its failure.
Rather than throwing it away, I thought I'd try to fix it and get another 15 years of life out of it. Here's how I did it.
Summary
The factory part is no longer available for purchase, so I had to fabricate a part that would serve the same purpose using readily available material and a minimal set of basic hand and power tools.
Factory Parts?
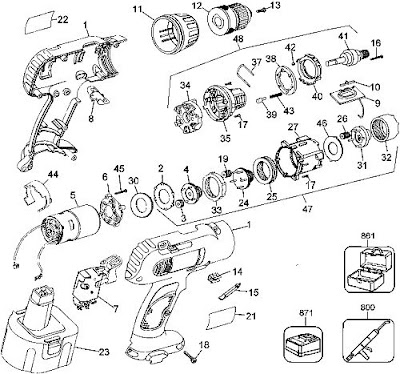
Factory replacement parts are always a good option versus fabricating or hacking your own fix. It's easier and doesn't usually cost much. I started at DeWALT's parts page. From there to the DeWALT service net which allows you to find parts for this and other brands: Porter Cable, Delta, and Black and Decker. I found the exploded diagram.
DeWALT DW953 Exploded Diagram
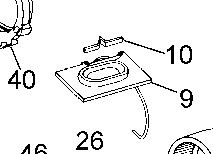
The broken part is #9, the "SHIFTER", and is no longer available. Probably because it was poorly designed and all the spare parts stock burned up a long time ago.
The Shifter
The shifter is a piece of plastic which engages a C clip (the curvy wire thing extending from the rectangular part 9 above) to move the shift collar in the drill. Part 10 is a detent spring that locks the shifter in the high or low position. You can see the C clip below and you can see the channel that part #9 rides in.
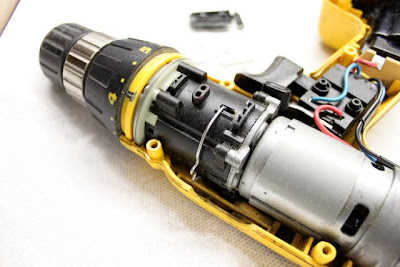 |
| Note shifter wire (C clip) and channel for part #9 |
The shifter is a piece of plastic with a channel in it, into which the C clip fits. The channel essentially broke in half as you can see below.
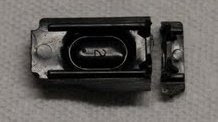 |
| The shift selector split in half |
Options and Solution
I could have used plastic glue to repair the part. I've used plastic glue before with some success. But I don't entirely trust it for high stress areas and the design was already weak when it was a solid piece of plastic. A glued piece of plastic might not hold well.
Epoxy can make strong repairs and may have been a good option, provided both halves and the wire C clip were all glued together with a big blob of the stuff. This would've strengthened the area and it may have survived for a long time. But not as long as metal.
Instead I chose to crudely fabricate a replacement out of aluminum. Any of us mere mortals without a CNC machine in the garage can replicate this work with basic hand tools.
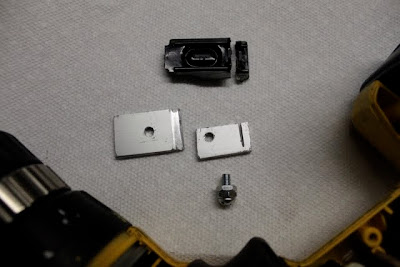 |
| Broken shifter at top, two-piece fabricated shifter in the middle. |
I made the replacement out of two pieces of aluminum arranged in layers. The top layer slides in the original channel in the drill's body (below).
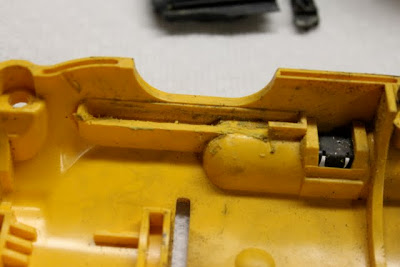 |
| Channel where shifter slides. Some material had to be removed. |
 |
| Top layer (left) and bottom layer with slot (right) |
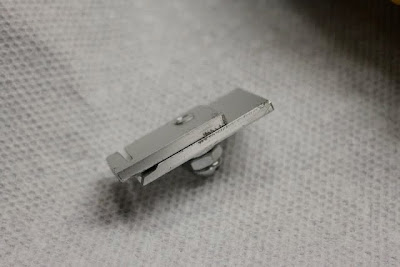 |
| Bolted together |
 |
| Finished and installed |
I also had to remove some material from the drill body, specifically the channel in which the part slides. Otherwise it was a pretty straightforward process.
The Results
How does it work? The first iteration didn't work well as I positioned the knob/bolt in the wrong spot. The second time around I got it right. Shifting has never been smoother.
Which is good but also bad. There's no longer a spring to make the shifter click and stay in place. It slides so easily that the shifter will slide forward and backwards just with gravity.
I'll figure out a fix for that one of these days... But at least I have my drill back.
Batteries
I'm due for new batteries, however. I am thinking of getting rebuilt battery packs rather than buying new. I looked around and I think I'll go with Voltman Batteries. We'll see.


No comments:
Post a Comment